Tuesday, 16 October 2012


               AIR CONDITIONING


-There are there methods of making things cold by the transfer of heat:
*Conduction
*Conduction
*Radiation

Conduction
-Conduction is the transfer of heat in rays.
When you heat one side of a steel bar,the other side becomes warmer by condition.


Radiation
-Radiation is the transfer of heat in rays.
-Heat from the sun is transferred to the earth in rays.
-All objects that contain heat, radiate some heat.


Convection

-Convection is the transfer of heat by movement of warmer liquid or gas.


Saturday, 6 October 2012


                       Wheel bearings!

What is a wheel bearing?

Wheel bearing are one of the most crucial components of a car's suspension. They are usually located in the hub (the part that the brakes and wheels are attached to) or even the brake drum or rotor itself. Wheel bearings allow the wheel to rotate freely as the car travels down the road. Most cars have an inner and an outer bearing on each wheel.


Components

  • A wheel bearing is a simple device made up of two main components, the bearing itself and the race. The bearing itself consists of a metal housing that is pressed over a row of ball bearings that circle the metal housing. These ball bearings in turn ride on the race, which is a very smooth metal surface. When a wheel is rolling, the action of the ball bearings rolling against the surface of the hub that allows the wheel to spin smoothly.

Wheel Bearing Problems

  • Problems with wheel bearings arise from wear, which can be caused by a variety of factors. Bearings are protected from dirt and debris by oil seals. If these seals fail and dirt finds its way into the bearing, damage can occur to the bearing and the race. Another factor can be long-term wear, affecting the bearings' ability to function properly. If a bearing falls apart completely, it can render the car undriveable and dangerous. The brakes will not function correctly and the wheel will not stay in its proper orientation.


- How do I know if I need new wheel bearings? Most of the time we don't even know that they need service. We just drive and never think about them. Most car manufacturers recommend a wheel bearing clean, inspection and repack every 30,000 miles. This is usually done along with the front brake service. They need to be replaced when there is scoring and pitting or they become noisy.

Wheel Bearing Replacement

How to replace a bearing.


  1. First remove the bearing cap. This is a press fit and to remove it grab it with your Channelocks and work it back and forth until it pops off. Be careful not to crush it as you remove it.
  2. Once the cap is off you will see a cotter pin, Remove the cotter pin and remove the retainer ring. If your vehicle has a castellated nut, you will not have a retaining ring.
  3. Using your Channelocks or adjustable wrench, remove the nut from the spindle.
  4. Now remove the outer wheel bearing and washer and lay it aside.
  5. Slide the rotor or drum off the spindle. This may be difficult, but it will come off. Don't worry about hurting the grease seal; we're going to replace it anyway.
  6. Now that the rotor or drum is off, use a suitable tool to remove the grease seal and take out the inner wheel bearing.
  7. Using some of the rags wipe all the old grease from inside the hub.
  8. Now we need to remove the bearing races from the hub. Take a punch with a flat narrow tip and place it on the back of the race. Most hubs have gaps in them to expose the back of the race to make removal easier. Tap the race out, alternating from side to side so it comes out evenly and doesn't get cocked in the hub. Once it's out, flip the rotor or drum over and do the same for the other race.
When both races are out, clean the inside of the hub with some rags. Also make sure the spindle is clean as well. You can even use some carburetor cleaner to do a really good job of cleaning. From this point on cleanliness is important. You do not want any dirt, sand or metal chips inside the hub.


Now that everything is nice and clean, let's put the new races and bearings in.
Take one of the new races and coat the outside with some wheel bearing grease. This will help it slide into the hub. If you have a race driver, select the proper size and tap the new race into the hub. Make sure you drive it in evenly and do not cock it. If you don't have a race driver, use your hammer to tap the outside of the race to get it started making sure you tap evenly around the race. When it is flush with the hub, use your flat narrow punch and drive it in the rest of the way. Make sure it is fully seated. The sound of the tapping will change when it's seated and you can look from the other side to visually confirm this.
Do the same for the other race.
If you don't have a bearing packer, you will need to pack them by hand. Put a glob of wheel bearing grease in the palm of your hand. Slip the wheel bearing on your index finger like a ring with the wide end facing out. Then tap the bearing into the glob of grease until you see it coming out the other side. When you see it come out turn the whole bearing, don't just rotate it on your finger, and repeat the procedure until the whole bearing has grease coming out the other side. Repeat this for the other bearings.


  1. Now that we have the races installed and bearings packed, we can put everything back together. Starting with the inner bearing put a bed of grease on the surface of the race and then push the inner wheel bearing into it. Take the new grease seal and tap it into place, don't bend or distort it. You can use a small block of wood to help.
  2. Put a coating of grease inside the hub between the two races and on the spindle -- too much is better than too little. If any moisture should happen to get inside, the grease will keep the metal from rusting.
  3. Slide the brake rotor or drum straight onto the spindle. It should slide on easily. If it doesn't, the bearing is cocked a little. Slide it off and make sure the bearing is sitting flat and try again.
  4. Once it's on, grease the outer race and slide the outer wheel bearing on. Slide the washer on. The washer will probably have a tab that will align with the spindle, make sure that you line them up when you put it in.
  5. Place the nut on the spindle and tighten it by hand until it won't go anymore. Spin the rotor or drum a few times back and forth and then tighten the nut more by hand. This insures that the bearings are seated. Do it a couple of times until you can't get it any tighter by hand.
  6. Now tighten the nut ¼ turn, no more than 16 foot-pounds. If you have a castellated nut, line it up with the hole going through the spindle. Install a NEW cotter pin. If you have a retaining ring, place it on the nut and install the pin. Never reuse the old cotter pin and make sure you use it.
  7. Put a small blob of grease on the inside of the dust cap and tap it into place, being careful not to crush it. Make sure it is fully seated.
    That's it, you're ready to roll nice and smooth!


Symptoms

  • Symptoms of a bad bearing are noisy rubbing as the car is driven and that usually gets louder as speeds increase. If the bearings are very worn, another symptom can be vague steering, vibrating suspension and darty behavior from the suspension as the wheel moves unevenly around the bearing.

Maintenance

  • Bearings can be checked by jacking up the car and pushing on the wheel. If there is excessive movement of the wheel on the spindle, it's probably the bearing. Wheel-bearing maintenance is relatively simple but time-consuming, since the wheel, brakes and hub need to be removed. Once the bearing is visible, check the bearings for wear and the races for any scratches or wear. Clean everything thoroughly and repack the bearings with a generous amount of bearing grease. This should be done every 20,000 to 30,000 miles.

Replacement

  • Replacing bearings can be time-consuming, but most accomplished home mechanics can do the job. It involves removing the wheel, brake and hub. Once the hub is off, the bearing races are removed and new ones pressed in. This is usually the most difficult part. Once the bearings are packed and installed, everything is reinstalled in the reverse of removal. Refer to a workshop manual for detailed instructions about your car's model. This should be done every 40,000 to 50,000 miles.

Warning

  • A destroyed wheel bearing can result in a vehicle that is difficult to control. If you suspect that your bearings are bad, do not drive the vehicle until it is fixed or you know it is safe.


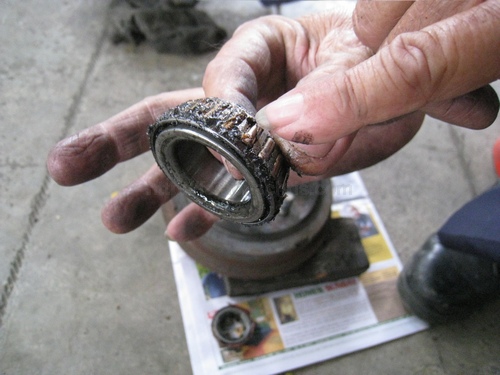
^ NEW BEARING !   ^ WORN BEARING
     (GOOD)                (BAD)


Wednesday, 3 October 2012


To change a tyre          How to Choose the Right Rims for Tour Tires  Tires rims


To change a tyre is something most people are not keen on. Here we try to make it easy and as interesting for you. So that the next time you are involved in this fix, you will be out of it in a jiffy.
Before you begin, make sure that
The jack in your car is there
There is a properly inflated spare tyre
You have a lug wrench that fits your wheel
Lug bolts

Down to the basics
After you have parked your car safely, put a couple of bricks or stones beneath the tyres to make sure that it does not roll down. Bring your jack, spare wheel and lug wrench to the work area. Loosen the nuts without having jacked up the car, to prevent the wheel spin on you. Turn counterclockwise to loosen the nut until it comes off. Next jack up the car. Remove the old wheel now. After having taken out the lug nuts, pull the wheel with your weight forward to prevent from falling backward. Adjust well the spare wheel in the threaded shafts so that they fit. Then tighten the nuts in the proper order. Lower the jack so that the tyre rests on the ground. Replace the hubcap or the plate.


replace-tyers


Tyres

Your tyres are what sits between you and the road.

Looking after your tyres will not only save you money - on tyres and also on fuel - but they are an essential safety feature of your car. Tyre replacements can often be unexpected and expensive so it makes sense to take care of them.


Taking care of your tyres

Keep your tyres inflated correctly. Inflate tyres to your manufacturers recommendations and recheck once a month. The recommended tyre pressure is usually recorded on the pillar of the driver’s door. Under inflated tyres result in increased road friction, meaning that the tyres will wear faster and require move fuel to run the car.

All four tyres should be of the same tread pattern.  Ideally, the spare tyre should be identical. If fitting new tyres, put them on the same axle - preferably the rear. Regularly check the tread depth and tyre pressures (including the spare).

Match your tyres

Driving with mismatched tyres is dangerous. Among other warrant of fitness requirements, tyres on the same axle must be of the same tread pattern. However, there is no legal requirement for tyres on all axles to be the same tread, even though NZTA agrees that fitting four identical tyres (preferably summer) provides the best grip.

Snow tyres are made with a softer rubber compound and deeper treads, designed to maintain grip in ice and snow. They can be distinguished by their deep square-patterned tread blocks with numerous fine blades. Newer snow tyres are also marked with a 'mountain snowflake' symbol on the sidewall. They might be found on used cars imported from colder parts of Japan. In Japan, such tyres must have at least 50% tread depth to be legal, yet many below this will still comply with NZ's minimum tread depth of 1.5mm and thus can be used here.


Wheel balance


Tire balance, also referred to as tire unbalance or imbalance, describes the distribution of mass within an automobile tire or the entire wheel to which it is attached.
When the wheel rotates, asymmetries of mass may cause it to hop or wobble, which can cause ride disturbances, usually vertical and lateral vibrations. It can also result in a wobbling of the steering wheel or of the entire vehicle. The ride disturbance, due to unbalance, usually increases with speed. Vehicle suspensions can become excited by unbalance forces when the speed of the wheel reaches a point that its rotating frequency equals the suspension’s resonant frequency.


Firstly lets explain exactly what wheel balancing is and isn’t and then how much you should be expecting to pay for it.

Wheel balance is the art of measuring a wheel and tyre assemblys heavy spot and counter acting them with small lead weights.

If your wheels/tyres are out of balance you will likely get a vibration at speed ( 80km + ). The steering wheel may shake if its a front tyre, the whole car normally shakes if it is a rear tyre. A good tyre fitter will ask you what your symptoms are before ripping in and just balancing your wheels.

Wheels are balanced when new tyres are fitted, the wheel is spun up on a wheel balancing machine and the tyre fitter then bangs on small lead weights and then rechecks, until it spins up perfectly.

Things to watch out for..

Too much weight – a good tyre would normally only need a smallish weight, if the fitter is attaching enough weights to sink a small boat, it would be a good idea to ask why!
Weights should be all in one place on each side of the wheel. i.e you would not have weights opposite each other as that is counter productive.
If you get a shake or wobble at slow speeds, you may have a buckled rim or out of round tyre. Occasionally the tyre may even be seperating which is where the tread and casing start warping out of shape
For pricing here are some examples we found from calling around.

Standard car/alloy wheel balance averaged out at around $12 to $13 per tyre.

RV/Light truck wheel balance $16 per tyre


Tuesday, 18 September 2012

Seat belts                                        

A seat belt, sometimes called a safety belt, is a safety harness designed to secure the occupant of a vehicle against harmful movement that may result during a collision or a sudden stop. A seat belt reduces the likelihood and severity of injury in a traffic collision by stopping the vehicle occupant from hitting hard against interior elements of the vehicle or other passengers (the so-called second impact), by keeping occupants positioned correctly for maximum benefit from the airbag, if the vehicle is so equipped, and by preventing occupants being ejected from the vehicle.


 - If the seat belt is worn,ripped or it wont click in to the tounge then that mean the vehicle will fail warrant. All the bolts need to be tight and stable, make sure the belt goes back to place when you pull it towards the tounge, if it does not then that will fail warrant aswell.


HOW TO TAKE OFF A SEAT BELT

- When you are taking off a seat belt you first need to take off battery cable, as wires are connected to it which could cause damage. carefully take off the seat let cover and not to brake anything and undo the bolts. Clean all the dust. Take off the metal nail that is  in the belt and pull the belt out and replace it the same way you took it off.


WARRANT AND FITNESS 


W.O.F CHECK
- Steering, brake,hand brake secure
- Indicators and full beam working in dash board
- Check seat beat, should lock, check all belts in car
- No rust on structure
 - If it has a space saver/ spare wheel, make sure its secure.
- Inside and outside handles working
- Make sure gas cap is secure
- Check back and front lights
- Has to have reflectors working
- Make sure head lights are in center
- Make Sure the horn is working
- Wiper blades need to be in good condition
- Windows must have no cracks in front of drivers side about "30 cm"
- Shocks , tyres , steering boot and brake hose need to be in good condition.
- Speedo needs to be working
- Suspension, wheel bearing , steering rack need to be in good condition ( no excessive play )
- No exhaust leak , no rust and leak on manifold


-Every car has its own VIN ( Vehicle Identification Number)  number which is manly under the bonnet, if not then it would be by the door frame somewhere. You also need the make, modal , odometer and registration N.O as-well. Make sure all the numbers are correct so double check if you are not sure.

- When checking the vehicle , make sure you look carefully and not to miss out a problem on the car because its for the safety of the people and if an accident did happen after you have passed the vehicle, it might be your fault.

      <<<<<<<   VIN NUMBER


 - If there is a problem with the vehicle then you need to tell the person that owns the car to fix it before they get their warrant. They have 28 days to fix it so they can get a RE-CHECK, if they do not want to pay again for another inspection .

Monday, 27 August 2012


Suspension and steering systems!


A spring is an elastic object used to store mechanical energy. Springs are usually made out of spring steel. Small springs can be wound from pre-hardened stock, while larger ones are made from annealed steel and hardened after fabrication.When a spring is compressed or stretched, the force it exerts is proportional to its change in length. The rate or spring constant of a spring is the change in the force it exerts, divided by the change in deflection of the spring.

Suspension systems serve a dual purpose — contributing to the vehicle's roadholding/handling and braking for good active safety and driving pleasure, and keeping vehicle occupants comfortable and reasonably well isolated from road noise, bumps, and vibrations,etc. These goals are generally at odds, so the tuning of suspensions involves finding the right compromise. It is important for the suspension to keep the road wheel in contact with the road surface as much as possible, because all the forces acting on the vehicle do so through the contact patches of the tires.


A shock absorber is a mechanical device designed to smooth out or damp shock impulse, and dissipate kinetic energy. It is a type of dashpot.Shock absorbers are an important part of automobile and motorcycle suspensions, aircraft landing gear, and the supports for many industrial machines. Large shock absorbers have also been used in structural engineering to reduce the susceptibility of structures to earthquake damage and resonance.


What is a shock absorber?

A shock absorber is a suspension component that controls the up-and-down motion of the vehicle’s wheels.

Though the devices are called shock absorbers, the job of absorbing the jolts that result when the wheels pass over bumps or dips is handled mostly by the springs. Shock absorbers would more accurately be named dampers, as they are called in the United Kingdom. Their main job is to damp the motion mentioned above, keeping the vehicle’s body from bouncing down the road on its springs. In fact, the simplest shock absorber test is to push down on the vehicle’s bumper; a healthy shock absorber or MacPherson strut will allow the body to rebound but quickly come to rest. If the vehicle goes into a prolonged bounce cycle, the shock needs to be replaced. Bad shocks or struts aren’t safe because they fail to maximize tire contact with the road, which degrades handling and braking.


Power Steering Pump


Power steering helps drivers steer vehicles by augmenting steering effort of the steering wheel. Hydraulic or electric actuators add controlled energy to the steering mechanism, so the driver needs to provide only modest effort regardless of conditions. Power steering helps considerably when a vehicle is stopped or moving slowly. Also, power steering provides some feedback of forces acting on the front wheels to give an ongoing sense of how the wheels are interacting with the road; this is typically called "rοad feel".
Representative power steering systems for cars augment steering effort via an actuator, a hydraulic cylinder, which is part of a servo system. These systems have a direct mechanical connection between the steering wheel and the linkage that steers the wheels. This means that power-steering system failure (to augment effort) still permits the vehicle to be steered using manual effort alone.


Steering Rack 


Rack-and-pinion steering is quickly becoming the most common type of steering on cars, small trucks and SUVs. It is actually a pretty simple mechanism. A rack-and-pinion gearset is enclosed in a metal tube, with each end of the rack protruding from the tube. A rod, called a tie rod, connects to each end of the rack.
The pinion gear is attached to the steering shaft. When you turn the steering wheel, the gear spins, moving the rack. The tie rod at each end of the rack connects to the steering arm on the spindle.


Part of the rack contains a cylinder with a piston in the middle. The piston is connected to the rack. There are two fluid ports, one on either side of the piston. Supplying higher-pressure fluid to one side of the piston forces the piston to move, which in turn moves the rack, providing the power assist.


What Is A Tie Rod?

The tie rod is part of the steering mechanism in a vehicle. A tie rod is a slender structural rod that is used as a tie and capable of carrying tensile loads only.

A tie rod consists of an inner and an outer end. The spokes on a bicycle’s wheels are tie rods. As the ratio of its length to the radius of gyration of its cross section is normally quite large, it would likely buckle under the action of compressive forces.

The tie rod transmits force from the steering center link or the rack gear to the steering knuckle. This will cause the wheel to turn. The outer tie rod end connects with an adjusting sleeve, which allows the length of the tie rod to be adjustable. This adjustment is used to set a vehicle’s alignment angle.


Tuesday, 21 August 2012

GEAR BOX!


How Manual Transmissions Work

Mercedes-Benz Actros, manual transmission

A manual transmission, also known as a manual gearbox or standard transmission (informally, a manual, 5 speed, or the number of forward gears said with the word speed following i.e.: 4 speed with overdrive, 4 speed, 5 speed, 6 speed or standard, stick-shift, straight shift, straight, or straight drive (U.S.)) is a type of transmission used in motor vehicle applications. It generally uses a driver-operated clutch, typically operated by a foot pedal (automobile) or hand lever (motorcycle), for regulating torque transfer from the internal combustion engine to the transmission; and a gear stick, either operated by foot (as in a motorcycle) or by hand (as on an automobile).

CLUTCH


A clutch is a mechanical device that provides for the transmission of power (and therefore usually motion) from one component (the driving member) to another (the driven member) when engaged, but can be disengaged.
Clutches are used whenever the transmission of power or motion needs to be controlled either in amount or over time (e.g., electric screwdrivers limit how much torque is transmitted through use of a clutch; clutches control whether automobiles transmit engine power to the wheels).
In the simplest application, clutches are employed in devices which have two rotating shafts (drive shaft or line shaft). In these devices, one shaft is typically attached to a motor or other power unit (the driving member) while the other shaft (the driven member) provides output power for work to be done.


GEAR


A gear is a rotating machine part having cut teeth, or cogs, which mesh with another toothed part in order to transmit torque. Two or more gears working in tandem are called a transmission and can produce a mechanical advantage through a gear ratio and thus may be considered a simple machine. Geared devices can change the speed, torque, and direction of a power source. The most common situation is for a gear to mesh with another gear, however a gear can also mesh a non-rotating toothed part, called a rack, thereby producing translation instead of rotation.
The gears in a transmission are analogous to the wheels in a pulley. An advantage of gears is that the teeth of a gear prevent slipping.

When two gears of unequal number of teeth are combined a mechanical advantage is produced, with both the rotational speeds and the torques of the two gears differing in a simple relationship.
In transmissions which offer multiple gear ratios, such as bicycles and cars, the term gear, as in first gear, refers to a gear ratio rather than an actual physical gear. The term is used to describe similar devices even when gear ratio is continuous rather than discrete, or when the device does not actually contain any gears, as in a continuously variable transmission.


If you have ever driven a car with an automatic transmission, then you know that there are two big differences between an automatic transmission and a manu­al transmission:

There is no clutch pedal in an automatic transmission car.
There is no gear shift in an automatic transmission car. Once you put the transmission into drive, everything else is automatic.


It all starts in a place between the engine and the transmission with a component called torque converter, a large fluid turbine clutch, hidden inside the bell housing-the front part of the transmission bolted to the engine. The converter is actually a pump and turbine mechanism assembled together with a series of huge vain passages designed to create a strong centrifugal force using the oil going through them.

Once you start the engine, the torque converter begins to rotate at engine speed and waits for you to shift gears. When you go from Park to Drive, the converter turbine uses a shaft to engage a series of gear sets located inside their own drum cases. These gear sets are called planetary gearsets because their varied size gears mesh together in a planetary system-like configuration to rotate and provide different torque speeds.

The key characteristic of a torque converter is its ability to multiply torque when there is a substantial difference between input and output rotational speed, thus providing the equivalent of a reduction gear. Some of these devices are also equipped with a temporary locking mechanism which rigidly binds the engine to the transmission when their speeds are nearly equal, to avoid slippage and a resulting loss of efficiency.


BASIC PRINCIPLE 

- A vehicle has a transmission to have the ability to apply different RPMs to different driving speed rangers, This is done by having a number of different gears which each feature different gear ratios.Different gear ratios are needed for when the vehicle needs more power or speed as the road conditions change.


Monday, 23 July 2012


  BRAKES

-The braking system converts "kinetic energy" into "heat energy".

Brake master 40mm
caliper 160mm                     3200N
wheel cylinder 20mm             400N
Brake master cylinder            800N

-Today in class we had to jack up a car from the front and the rear.I first checked around the car to find anything that could be a hazed. when it was clear i jacked up the car i placed a wooden block on the rear wheels so its more safe and secure,then i put the jack on the jacking point at the front of the vehicle. when the the car high enough for the stands to go under i lowered the jack slowly until it was safe to pull the jack out. I did the same for the rear. 


The master cylinder .

The master cylinder is a foot operated hydraulic pump that sends pressurized brake fluid through the brake lines and into the brake calipers/wheel cylinders.
In it's simplest form, the master cylinder consists of a housing, reservoir, piston, rubber cup, return spring and a rubber boot (manual only). A cylinder bore is machined into the center of the housing. The spring, cup and piston(s) slide in this bore and produce hydraulic pressure. The reservoir keeps the system full of fluid as the brake lining wears and the dust boot serves to keep contaminates from entering the rear of the master cylinder.


Bleeding 

- General principle kinetic to heat energy.
- Force on the brake pedal 
- Force the push rod in the brake booster which in turn
Forces the primary piston in the master cylinder forward 
, the fluid pressure presses on the secondary piston.
- The brake pipes carry the fluid pressure  to proportioning valve 
then to the brake calliper.
The piston forces the brake pad against the disc rotor.
The friction reduces the rotor speed.
The wheel being attached to the rotor is therefore slowed down 


How to bleed 

- Clean the reservoir 
- Top up with new fluid 
- Select Dot 
- Clamp the brake hose so pressure doesn’t go into the master cylinder
- Open bleeder nipple 
- Press the piston
- Close nipple 
- Place block under the pedal
- The guy in the car pumps about 6 times then he holds down
- Open nipple, then close again
- Pump 6 more times, hold down 
- Open nipple and close again 


How to adjust rear brake
- Undo the hand brake bolt.
- When you have replaced the brake shoes ,you tight up the drum by
        Turning the spreader to the right adjustment. To find out that it is tight enough
        You just turn the drum and see if it is not too tight or to loose.
- Then tight up the hand brake and pull the hand brake up to 5 clicks.


-Today in class we had to take off the brake shoes and put them back on, we had 2 hours to do it.
we had 4 people on a car, which was Shivy, Russel, Louis and I.Shivy and Louis took them off and Russel and i had to put them back.I personally found putting back the springs back on because they were being very difficult.


The Wheel cylinder 


-A wheel cylinder is a component in a drum brake system. It is located in each wheel and is usually at the top, above the shoes. Its responsibility is to exert force onto the shoes so they can contact the drum and stop the vehicle with friction. What connects these wheel cylinders to the shoes are usually small rods shaped like a birds beak. It is very similar to a master cylinder and functions in pretty much the same way, consisting of just a simple little plunger on the inside. On older vehicles these will begin to leak and hinder the performance of the brakes, but are normally inexpensive and easy to replace.


-The wheel cylinder consists of a cylinder that has two pistons, one on each side. Each piston has a rubber seal and a shaft that connects the piston with a brake shoe. When brake pressure is applied, the pistons are forced out pushing the shoes into contact with the drum. Wheel cylinders must be rebuilt or replaced if they show signs of leaking.


Note- never take the drums off when bleeding the front brakes because as you are pumping the brake.The brake shoes will push out will allow the seals to pop out and you may need to change the seal or sometimes even the hole wheel cylinder. Always keep the drums on and usual finish the back first then start doing the front.

The brake pads

Brake pads convert the kinetic energy of the car to thermal energy by friction. Two brake pads are contained in the brake caliper with their friction surfaces facing the rotor. When the brakes are hydraulically applied, the caliper clamps or squeezes the two pads together into the spinning rotor to slow/stop the vehicle. When a brake pad is heated by contact with a rotor, it transfers small amounts of friction material to the disc, turning it dull gray. The brake pad and disc (both now with friction material), then "stick" to each other, providing the friction that stops the vehicle.

What a good brake pad looks like: 100%


What a worn brake pad looks like: 20%


^ this is a uneven brake pad. This is uneven because the sliding pin was jammed and needs to be adjusted, with grease on it. or it could be the piston jammed up.