Tuesday, 16 October 2012
AIR CONDITIONING
-There are there methods of making things cold by the transfer of heat:
*Conduction
*Conduction
*Radiation
Conduction
-Conduction is the transfer of heat in rays.
When you heat one side of a steel bar,the other side becomes warmer by condition.
Radiation
-Radiation is the transfer of heat in rays.
-Heat from the sun is transferred to the earth in rays.
-All objects that contain heat, radiate some heat.
Convection
-Convection is the transfer of heat by movement of warmer liquid or gas.
Saturday, 6 October 2012
Wheel bearings!
What is a wheel bearing?
Wheel bearing are one of the most crucial components of a car's suspension. They are usually located in the hub (the part that the brakes and wheels are attached to) or even the brake drum or rotor itself. Wheel bearings allow the wheel to rotate freely as the car travels down the road. Most cars have an inner and an outer bearing on each wheel.
Components
- A wheel bearing is a simple device made up of two main components, the bearing itself and the race. The bearing itself consists of a metal housing that is pressed over a row of ball bearings that circle the metal housing. These ball bearings in turn ride on the race, which is a very smooth metal surface. When a wheel is rolling, the action of the ball bearings rolling against the surface of the hub that allows the wheel to spin smoothly.
Wheel Bearing Problems
- Problems with wheel bearings arise from wear, which can be caused by a variety of factors. Bearings are protected from dirt and debris by oil seals. If these seals fail and dirt finds its way into the bearing, damage can occur to the bearing and the race. Another factor can be long-term wear, affecting the bearings' ability to function properly. If a bearing falls apart completely, it can render the car undriveable and dangerous. The brakes will not function correctly and the wheel will not stay in its proper orientation.
- How do I know if I need new wheel bearings? Most of the time we don't even know that they need service. We just drive and never think about them. Most car manufacturers recommend a wheel bearing clean, inspection and repack every 30,000 miles. This is usually done along with the front brake service. They need to be replaced when there is scoring and pitting or they become noisy.
How to replace a bearing.
- First remove the bearing cap. This is a press fit and to remove it grab it with your Channelocks and work it back and forth until it pops off. Be careful not to crush it as you remove it.
- Once the cap is off you will see a cotter pin, Remove the cotter pin and remove the retainer ring. If your vehicle has a castellated nut, you will not have a retaining ring.
- Using your Channelocks or adjustable wrench, remove the nut from the spindle.
- Now remove the outer wheel bearing and washer and lay it aside.
- Slide the rotor or drum off the spindle. This may be difficult, but it will come off. Don't worry about hurting the grease seal; we're going to replace it anyway.
- Now that the rotor or drum is off, use a suitable tool to remove the grease seal and take out the inner wheel bearing.
- Using some of the rags wipe all the old grease from inside the hub.
- Now we need to remove the bearing races from the hub. Take a punch with a flat narrow tip and place it on the back of the race. Most hubs have gaps in them to expose the back of the race to make removal easier. Tap the race out, alternating from side to side so it comes out evenly and doesn't get cocked in the hub. Once it's out, flip the rotor or drum over and do the same for the other race.
When both races are out, clean the inside of the hub with some rags. Also make sure the spindle is clean as well. You can even use some carburetor cleaner to do a really good job of cleaning. From this point on cleanliness is important. You do not want any dirt, sand or metal chips inside the hub.
Now that everything is nice and clean, let's put the new races and bearings in.
Take one of the new races and coat the outside with some wheel bearing grease. This will help it slide into the hub. If you have a race driver, select the proper size and tap the new race into the hub. Make sure you drive it in evenly and do not cock it. If you don't have a race driver, use your hammer to tap the outside of the race to get it started making sure you tap evenly around the race. When it is flush with the hub, use your flat narrow punch and drive it in the rest of the way. Make sure it is fully seated. The sound of the tapping will change when it's seated and you can look from the other side to visually confirm this.
Do the same for the other race.
If you don't have a bearing packer, you will need to pack them by hand. Put a glob of wheel bearing grease in the palm of your hand. Slip the wheel bearing on your index finger like a ring with the wide end facing out. Then tap the bearing into the glob of grease until you see it coming out the other side. When you see it come out turn the whole bearing, don't just rotate it on your finger, and repeat the procedure until the whole bearing has grease coming out the other side. Repeat this for the other bearings.
- Now that we have the races installed and bearings packed, we can put everything back together. Starting with the inner bearing put a bed of grease on the surface of the race and then push the inner wheel bearing into it. Take the new grease seal and tap it into place, don't bend or distort it. You can use a small block of wood to help.
- Put a coating of grease inside the hub between the two races and on the spindle -- too much is better than too little. If any moisture should happen to get inside, the grease will keep the metal from rusting.
- Slide the brake rotor or drum straight onto the spindle. It should slide on easily. If it doesn't, the bearing is cocked a little. Slide it off and make sure the bearing is sitting flat and try again.
- Once it's on, grease the outer race and slide the outer wheel bearing on. Slide the washer on. The washer will probably have a tab that will align with the spindle, make sure that you line them up when you put it in.
- Place the nut on the spindle and tighten it by hand until it won't go anymore. Spin the rotor or drum a few times back and forth and then tighten the nut more by hand. This insures that the bearings are seated. Do it a couple of times until you can't get it any tighter by hand.
- Now tighten the nut ¼ turn, no more than 16 foot-pounds. If you have a castellated nut, line it up with the hole going through the spindle. Install a NEW cotter pin. If you have a retaining ring, place it on the nut and install the pin. Never reuse the old cotter pin and make sure you use it.
- Put a small blob of grease on the inside of the dust cap and tap it into place, being careful not to crush it. Make sure it is fully seated.That's it, you're ready to roll nice and smooth!
Symptoms
- Symptoms of a bad bearing are noisy rubbing as the car is driven and that usually gets louder as speeds increase. If the bearings are very worn, another symptom can be vague steering, vibrating suspension and darty behavior from the suspension as the wheel moves unevenly around the bearing.
Maintenance
- Bearings can be checked by jacking up the car and pushing on the wheel. If there is excessive movement of the wheel on the spindle, it's probably the bearing. Wheel-bearing maintenance is relatively simple but time-consuming, since the wheel, brakes and hub need to be removed. Once the bearing is visible, check the bearings for wear and the races for any scratches or wear. Clean everything thoroughly and repack the bearings with a generous amount of bearing grease. This should be done every 20,000 to 30,000 miles.
Replacement
- Replacing bearings can be time-consuming, but most accomplished home mechanics can do the job. It involves removing the wheel, brake and hub. Once the hub is off, the bearing races are removed and new ones pressed in. This is usually the most difficult part. Once the bearings are packed and installed, everything is reinstalled in the reverse of removal. Refer to a workshop manual for detailed instructions about your car's model. This should be done every 40,000 to 50,000 miles.
Warning
- A destroyed wheel bearing can result in a vehicle that is difficult to control. If you suspect that your bearings are bad, do not drive the vehicle until it is fixed or you know it is safe.
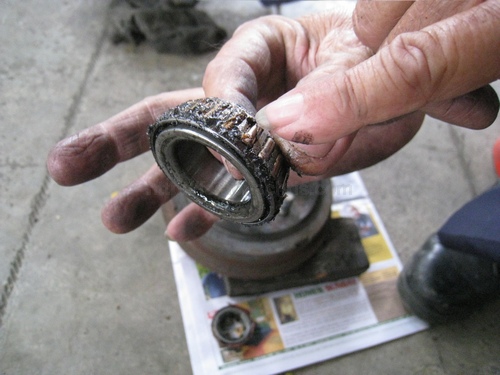
^ NEW BEARING ! ^ WORN BEARING
(GOOD) (BAD)
Wednesday, 3 October 2012
To change a tyre
To change a tyre is something most people are not keen on. Here we try to make it easy and as interesting for you. So that the next time you are involved in this fix, you will be out of it in a jiffy.
Before you begin, make sure that
The jack in your car is there
There is a properly inflated spare tyre
You have a lug wrench that fits your wheel
Lug bolts
Down to the basics
After you have parked your car safely, put a couple of bricks or stones beneath the tyres to make sure that it does not roll down. Bring your jack, spare wheel and lug wrench to the work area. Loosen the nuts without having jacked up the car, to prevent the wheel spin on you. Turn counterclockwise to loosen the nut until it comes off. Next jack up the car. Remove the old wheel now. After having taken out the lug nuts, pull the wheel with your weight forward to prevent from falling backward. Adjust well the spare wheel in the threaded shafts so that they fit. Then tighten the nuts in the proper order. Lower the jack so that the tyre rests on the ground. Replace the hubcap or the plate.
Tyres
Your tyres are what sits between you and the road.
Looking after your tyres will not only save you money - on tyres and also on fuel - but they are an essential safety feature of your car. Tyre replacements can often be unexpected and expensive so it makes sense to take care of them.
Taking care of your tyres
Keep your tyres inflated correctly. Inflate tyres to your manufacturers recommendations and recheck once a month. The recommended tyre pressure is usually recorded on the pillar of the driver’s door. Under inflated tyres result in increased road friction, meaning that the tyres will wear faster and require move fuel to run the car.
All four tyres should be of the same tread pattern. Ideally, the spare tyre should be identical. If fitting new tyres, put them on the same axle - preferably the rear. Regularly check the tread depth and tyre pressures (including the spare).
Match your tyres
Driving with mismatched tyres is dangerous. Among other warrant of fitness requirements, tyres on the same axle must be of the same tread pattern. However, there is no legal requirement for tyres on all axles to be the same tread, even though NZTA agrees that fitting four identical tyres (preferably summer) provides the best grip.
Snow tyres are made with a softer rubber compound and deeper treads, designed to maintain grip in ice and snow. They can be distinguished by their deep square-patterned tread blocks with numerous fine blades. Newer snow tyres are also marked with a 'mountain snowflake' symbol on the sidewall. They might be found on used cars imported from colder parts of Japan. In Japan, such tyres must have at least 50% tread depth to be legal, yet many below this will still comply with NZ's minimum tread depth of 1.5mm and thus can be used here.
Wheel balance
Tire balance, also referred to as tire unbalance or imbalance, describes the distribution of mass within an automobile tire or the entire wheel to which it is attached.
When the wheel rotates, asymmetries of mass may cause it to hop or wobble, which can cause ride disturbances, usually vertical and lateral vibrations. It can also result in a wobbling of the steering wheel or of the entire vehicle. The ride disturbance, due to unbalance, usually increases with speed. Vehicle suspensions can become excited by unbalance forces when the speed of the wheel reaches a point that its rotating frequency equals the suspension’s resonant frequency.
Firstly lets explain exactly what wheel balancing is and isn’t and then how much you should be expecting to pay for it.
Wheel balance is the art of measuring a wheel and tyre assemblys heavy spot and counter acting them with small lead weights.
If your wheels/tyres are out of balance you will likely get a vibration at speed ( 80km + ). The steering wheel may shake if its a front tyre, the whole car normally shakes if it is a rear tyre. A good tyre fitter will ask you what your symptoms are before ripping in and just balancing your wheels.
Wheels are balanced when new tyres are fitted, the wheel is spun up on a wheel balancing machine and the tyre fitter then bangs on small lead weights and then rechecks, until it spins up perfectly.
Things to watch out for..
Too much weight – a good tyre would normally only need a smallish weight, if the fitter is attaching enough weights to sink a small boat, it would be a good idea to ask why!
Weights should be all in one place on each side of the wheel. i.e you would not have weights opposite each other as that is counter productive.
If you get a shake or wobble at slow speeds, you may have a buckled rim or out of round tyre. Occasionally the tyre may even be seperating which is where the tread and casing start warping out of shape
For pricing here are some examples we found from calling around.
Standard car/alloy wheel balance averaged out at around $12 to $13 per tyre.
RV/Light truck wheel balance $16 per tyre
Subscribe to:
Posts (Atom)